Would you like to create devices that sense the environment, connect to the Internet and talk to the other side of the world?
For just 8 EUR, you can get a WLAN enabled, Arduino compatible development board. Sometimes the price includes USB cable and connected pin headers.
To follow this article, you should know Linux and Arduino. To learn from the start, join a BotBook.com IoT workshop.
This tutorial uses ESP8266-12E (aka ESP-12E). The last characters are very important. For example, devices ending with -01 are very different and not useful here.
Download Latest Arduino IDE & Blink Arduino
Normally, it’s much better to use package manager (apt-get). But Arduino core for ESP8266 requires a new version of Arduino IDE.
http://arduino.cc, Software, Linux 64 bits.
Extract the package.
$ cd Downloads
$ tar xf arduino*.tar.*
Add yourself to dialout group to get raw USB privileges.
$ sudo adduser $(whoami) dialout
$ newgrp dialout
To get dialout group for yourself properly, log out from your desktop and back again. But you can get the new group for single shell with ‘newgrp dialout’.
$ cd arduino*
$ ./arduino
Arduino IDE opens. If you have Arduino UNO, connect it, check Tools: Port; compile File: Examples: Blink and click upload. It’s much nicer to work on when you know “Hello world” / Blink works for plain Arduino.
Install Arduino core for ESP8266
In Arduino IDE menu:
File: Preferences: Additional Boards Manager URLs:
http://arduino.esp8266.com/stable/package_esp8266com_index.json
OK.
Then, in Arduino IDE menu:
 Tools: Board…: Boards Manager:
Click the item esp8266 by ESP8266 Community.
After clicking, it will show the version menu and install button. Select latest stable and click install:
2.3.0
Install
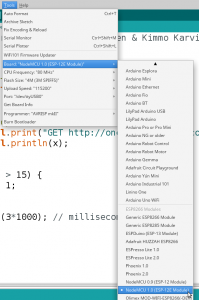
After installation, your tools menu will have multiple entries for ESP8266.
Hello ESP-12E!
 Connect ESP-12E using micro-USB cable.
Select the correct USB port in Tools: Port. Select the correct board
Use default settings for everything else: CPU frequency, flash size…
In Arduino IDE Menu, select File: Examples: 01. Basics: Blink.
Upload it (ctrl-U).

Look at the physical board and see ESP-12E blink.
Well done, you are now running your Arduino code on ESP-12E.
What Next?
Subscribe BotBook.com mailing list for IoT, Linux and robot related tips and offers.
Come to a BotBook style IoT workshop.
Connect to a wireless LAN using ESP.
References and Sources
Arduino homepage www.arduino.cc
Arduino core for ESP8266 WiFi chip
IoT.BotBook.com
Mielenkiintoinen kurssi, jonka avustuksella pääsi helposti kiinni IOT:n maailmaan.
Kirjoitan aiheesta vielä tarkemman blogipostauksen viikonlopun aikana!
http://kruteleff.com/