Two Machine Virtual Network With Debian 11 Bullseye and Vagrant
Start a two computer virtual network in minutes.
Vagrant
- Automatically sets up Virtualbox machines
- Automates SSH login
- No graphical user interface is needed
Install Vagrant
With Debian and Ubuntu, it's easy
$ sudo apt-get update
$ sudo apt-get install vagrant virtualbox
With Mac and Windows, you should download the installers and next-next a couple of times.
Vagrantfile
Create a new directory for your project, and save this Vagrantfile into it.
$ mkdir twohost/; cd twohost/
$ nano Vagrantfile
# -*- mode: ruby -*-
# vi: set ft=ruby :
# Copyright 2019-2021 Tero Karvinen http://TeroKarvinen.com

$tscript = <<TSCRIPT
set -o verbose
apt-get update
apt-get -y install tree
echo "Done - set up test environment - https://terokarvinen.com/search/?q=vagrant"
TSCRIPT

Vagrant.configure("2") do |config|
	config.vm.synced_folder ".", "/vagrant", disabled: true
	config.vm.synced_folder "shared/", "/home/vagrant/shared", create: true
	config.vm.provision "shell", inline: $tscript
	config.vm.box = "debian/bullseye64"

	config.vm.define "t001" do |t001|
		t001.vm.hostname = "t001"
		t001.vm.network "private_network", ip: "192.168.88.101"
	end

	config.vm.define "t002", primary: true do |t002|
		t002.vm.hostname = "t002"
		t002.vm.network "private_network", ip: "192.168.88.102"
	end

end
Enjoy your two hosts
You can ssh login to a host with
$ vagrant ssh t001
And exit back to your host OS
vagrant@t001$ exit
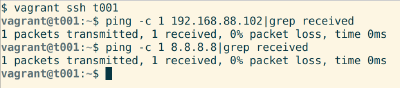
Both hosts can connect to each other and the Internet.
$ vagrant ssh t001
vagrant@t001$ ping -c 1 192.168.88.102
vagrant@t001$ ping -c 1 8.8.8.8 # Google nameserver
vagrant@t001$ exit

$ vagrant ssh t002
vagrant@t002$ ping -c 1 192.168.88.101
vagrant@t002$ exit
Destroy
Best part, it's so quick and easy you can just destroy your virtual machines and start fresh.
$ vagrant destroy # all files on both virtual machines are destroyed
And then get fresh, empty machines
$ vagrant up
Nice way to practice: got something working? Now destroy the machines, do it again from scratch. Rinse and repeat.
Got it working? How do you like it? Feel free to comment below.
Troubleshooting
If it works, you're done. If not, read on.
Error: "IP numbers not allowed" (or something like that) when running 'vagrant up'.
Some systems limit what addresses can be chosen. The allowed range is in the error message, you can feed it to ipcalc if you want to see lowest and highest allowed address. For example, 'ipcalc 192.168.56.0/21'. Simply change the IP address in Vagrantfile to allowed range. Here, I just changed the second to last number 88 to 60.
t001.vm.network "private_network", ip: "192.168.60.101"
# ...
t002.vm.network "private_network", ip: "192.168.60.102"
Adminstrivia
Vagrantfile is extracted from my earlier longer Vagrantfiles. Updated: added troubleshooting in case the allowed IP range differs.