Install Debian on Virt-Manager - Trixie update 2025
Debian 13-Trixie
Debian 13-Trixie was installed as a virtual machine on a Debian Linux host.
On Linux hosts, virt-manager is fast and stable option. For Debian hosts, it's easy to install with apt-get.
Hundreds of Linux learners have installed Linux using versions of this guide since 2021.
Could I have it as a 15-second Tik-Tok dance? There is a very short list of steps in the end.
Overview
To install Linux on a virtual machine:
- Download installation iso-image
- Install virtualization software (virt-manager) and create a new virtual machine
- Boot from installer iso-image. Linux desktop opens.
- Double click the installer on the desktop and answer questions.
- Reboot.
Linux is installed, you're on your new desktop browsing the Internet.
Linux on Linux
This article is for running Linux guest on Linux host. If you're still held hostage by Windows, I suggest you use VirtualBox to install virtual Linux guest on Windows host.
Environment I had before starting
The installation was performed on Debian 12-Bookworm Linux host. It was running directly on hardware. The machine was a modern amd64 desktop with ample RAM and hard drive space. It had a 2025 NVidia display adapter with proprietary drivers.
All virtualization software needs the UEFI ("BIOS") setting VT-X enabled. I had set this long time ago. If you have ever used virtualization and it worked fast and smooth, you have already set this up. The setting could be called AMD-X or similar in some systems. You can get to your UEFI ("BIOS") settings by pressing a specific key on boot, often F12, DEL or ESC.
I had taken backups. As I installed on a virtual machine, it was not required for the install. But I take backups because all hardware is 100% guaranteed to fail, eventually.
Download Installer: Debian 13 Xfce Live
From Debian homepage Debian.org, I clicked Other downloads. I chose Live Xfce to download the 3.5 GB ISO image.
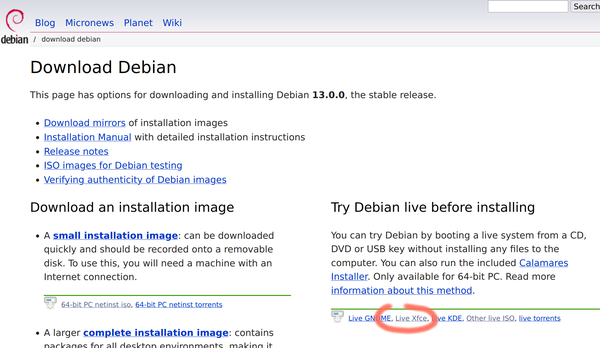
On the Other downloads, under heading "Try Debian live before installing", I chose Live Xfce. The link for "Live Xfce" ISO image will soon become obsolete as new versions are published.
To find the latest Live ISO image, you can go to the folder https://cdimage.debian.org/debian-cd/current-live/amd64/iso-hybrid/ . The latest link filename:
- Ends with ".iso". It's a disk image, containing all the files and folders the disk has. ISO images can be written to USB sticks with an application (gnome-disk-utility, dd, rufus) or used by virtualization softare (virt-manager, VirtualBox).
- "live" - you can run Linux from the image without installing it to hard drive. Very convenient for testing if your hardware works with Linux, or bypassing forgotten Windows and Linux passwords.
- xfce - the name of your favourite desktop environment. With Linux, you can choose how your desktop works. My recommendation is Xfce: simple, obvious, configurable. But if you want, you can try others - even install multiple desktop environmnents to choose from after you've installed Linux.
- amd64 - regular PC processor architecture. Having taught Linux to hundreds of students, about 95% of student computers are amd64. About 99% of desktop computers running Linux or Windows are amd64. Exceptions exists: Mac M1, M2, M3, M4 and Raspberry Pie are arm64.
- latest version - I downloaded 13.0.0, but you should take the latest stable. It's three integers, not a decimal number. So 13.10.0 > 13.9.0. The first number is the major version, 13-Trixie. It's the latest stable in 2025. It will have full support until 2028, and long term support until 2030.
I chose debian-live-13.0.0-amd64-xfce.iso, you should take the latest version number starting with 13.
The ISO image is almost 4 gigabytes, so downloading it will take a while.
Create new virtual machine in virt-manager
I already had virt-manager installed. If my memory serves me correct, I have installed it with 'sudo apt-get update; sudo apt-get -y install virt-manager'. In my setup, I start the default virtual networking with 'sudo virsh net-start default'.
File (menu): New Virtual Machine
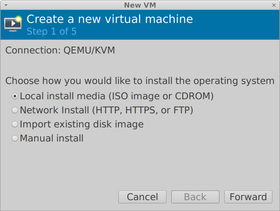
New VM 1/5 Local ISO
- Local install media (ISO image or CDROM)
New VM 2/5 Install media and operating system
- Choose ISO or CDROM install media: Browse.
- Locate ISO media volume (window)
- Browse Local
- Locate ISO media (window)
- Select the ISO image you downloaded earlier, e.g. "debian-live-13.0.0-amd64-xfce.iso". Open.
- Locate ISO media (window)
- Browse Local
- Choose the operating system you are installing
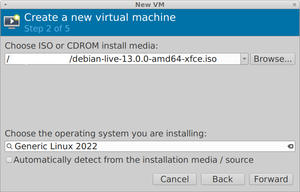
- No: Automatically detect from the installation media / source (disable)
- "Generic Linux 2022 (linux2022)". Don't choose Debian with mismatching major version, e.g. don't choose Debian 10.
- Forward
- Locate ISO media volume (window)
New VM 3/5 RAM
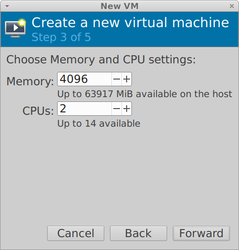
- Memory: 4096 MB
- CPUs: 4
For memory, more is better as long as there is also free memory on host after that. For regular desktop use, 4 GB is OK. It's possible to use 2 GB, but then it's inconvenient and slow. If you have a lot of RAM, 8 GB is more convenient.
For CPUs (CPU cores), more is faster. You could allow VM to use half of your CPU cores.
New VM - 4/5 Hard disk
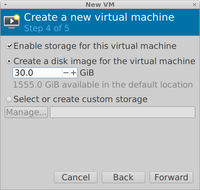
- Yes: Enable storage for this virtual machine (enabled by default)
- Yes: Create a disk image for the virtual machine (enabled by default):
- 30 GiB. This space is reserved from your host OS. Don't choose under 10 GB, because it's inconvenient to change this later.
- Finish
New VM 5/5 Name
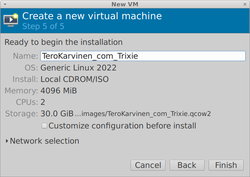
Name: "TeroKarvinen_com_Trixie". Choose a descriptive name. This is shown in virt-manager UI. You will have many VMs later, so naming is important.
Booting empty virtual machine
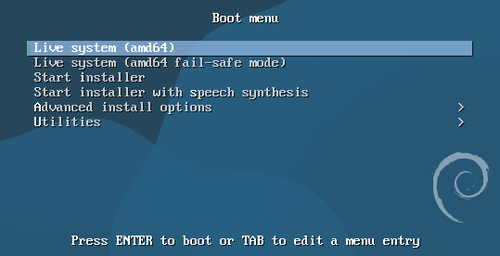
My Debian Live ISO image was automatically mounted, and the machine booted.
Live. I chose the Live option in the bootloader. Had I waited a couple of seconds, it would have been chosen automatically. You should normally choose the Live/Try without installing option even when installing, so that you can first test hardware support. Also, the install chosen from live desktop is usually faster than choosing Install from bootloader (Grub) menu.
If you close the guest VM window, your ISO installer image might be unmounted. If you get "no bootable...", just remount your ISO.
A blue and black image appears while it's booting. I pressed ESC to show logs. ESC toggles between log and the image.
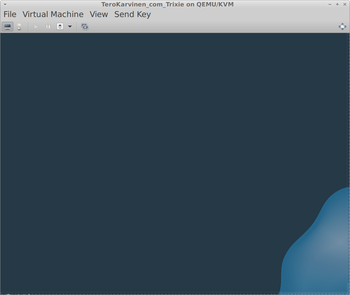
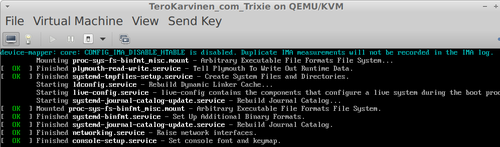
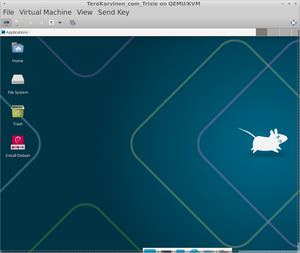
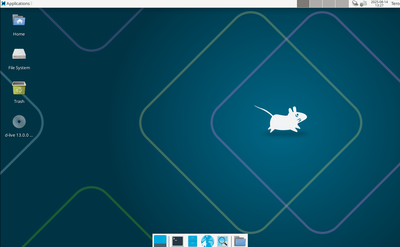
After about 20 seconds, desktop appears. I could see "Applications" menu on the top left, some icons on the desktop and a picture of mouse on the background.
Test with Live desktop
I wanted to see that basic things work before installing. This is very useful when installing directly on hardware, but I also do it with virtual machines.
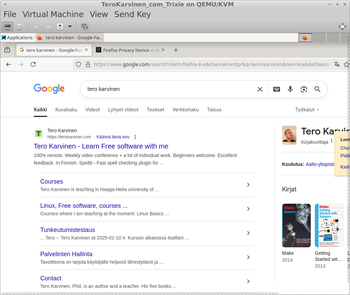
Applications (menu, top left): Web Browser.
Address bar (on browser): I wrote "tero karvinen"
After ugly captcha from Google (should have used DuckDuckGo) and rejecting ad cookies, I got to Google search. Clicked #1 link "Tero Karvinen - Learn Free software with me". I got to my homepage and clicked around. I noticed that fonts on the screen looked sharp.
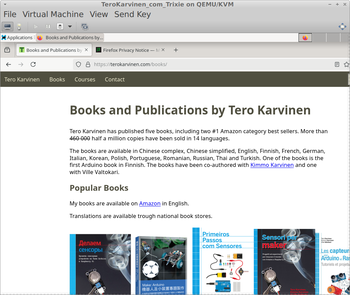
This test (googling "tero karvinen") showed that key features work to the extent I tested them:
- Display (could see what I'm browsing)
- Keyboard (typed search term)
- Mouse (clicked the link)
- Networking (could access terokarvinen.com)
My virt-manager guest window was too small for guest OS window. By moving mouse cursor to the right and bottom, scroll bars appeared. I streched the window holding the guest. My host OS had Xfce, so it was Alt + Right mouse button. It's also possible to strech the window from the exact bottom-right corner of the window.
It would not make any sense to say "I tested the computer and everything worked", because it's not possible to test "everything". I did not test i2c bus on the motherboard. But also, I did not test that Finnish keyboard åäö works. I did not draw circles with mouse to verify mouse read resolution. And so on...
Install
Backups. Before installing on hardware, you should take backups. Here, I'm not taking more backups because I'm only installing on a VM. But I'm taking backups because all hardware is 100.000% guaranteed to fail.
Install Debian (red icon on desktop) - Calamares installler opened.
1. Welcome
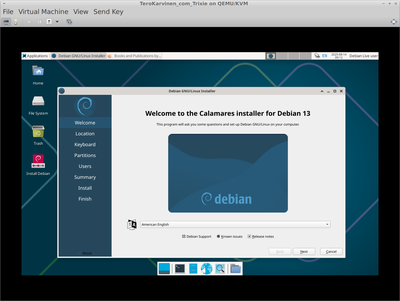
"Welcome to the Calamares installer for Debian 13"
- Language symbol: American English (chosen by default). You should administer any systems in English if possible. That makes it much easier to find advanced developer and admin documenation. Later, you might even be able to submit bugs to projects, which is nearly always done in English.
2. Location
- Region: Europe
- Zone: Helsinki
- The system language will be set to American English (United States)
- The numbers and dates locale will be set to suomi (Suomi)
Obviously, choose your own location. You can also click the map.
3. Keyboard
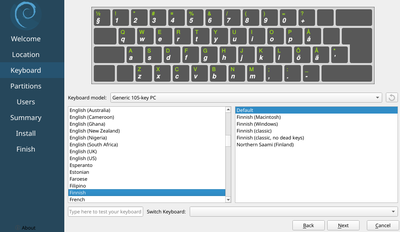
- Keyboard model: Generic 105-key PC
- Finnish
- Default
- Type here to test...: åäö
Choose whatever keyboard you have in front of you. Most keyboards are 105-key, with just different printing on some keys like ä and ö.
Keyboard tip: If you want to quickly change the keyboard temporarily on Live session, Applications: Terminal and run 'setxkbmap fi' or 'setxkbmap us'.
Keyboard tip: When your passwords are not working, one common cause is setting up the password with us keymap, then trying to type it with fi keymap. Or vice versa.
4. Partitions
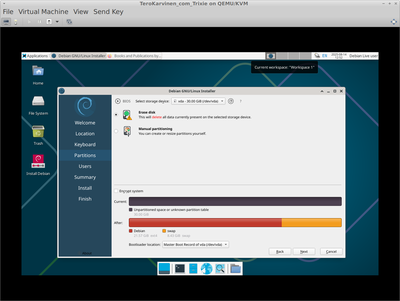
- Select storage device: vda - 30.00 GiB (/dev/vda)
- Erase disk. The most reliable option. Most operating system installers (like Windows installers) only provide an option similar to "Erase disk", removing partitions and writing over them. This will destroy and partly overwrite all data on the disk. Here, hopefully just the virtual disk.
- No: Encrypt system (left it disabled, because this is A VM, not a laptop or a desktop)
- Bootloader location: Master Boot Record of vda (/dev/vda). Must be MBR, Master Boot Record, or the computer will not boot. I wonder why they ask this question.
Partitioning tip: Always use full disk encryption on laptops and desktops. Otherwise, anyone with a Linux live USB can read all you files without knowing your password. For virtual machines, encryption is normally not needed.
Partitioning tip: You rarely need manual partitioning. If you do, you should know Linux partitioning schemes (e.g. single / or /var/ to different partition) and sometimes some obscure BIOS/UEFI details.
Partitioning tip: Let the stupid go first. If you want a dual boot installation, so that you choose on boot if Linux or Windows runs directly on hardware, take backups. Then install Windows first. Debian installer will show the option to stretch Windows partitions smaller, install Linux on the unpartitioned space and set up boot menu for both. Windows installer is not interested in working with other systems, so the installer is "stupid" in that sense. So let that go first.
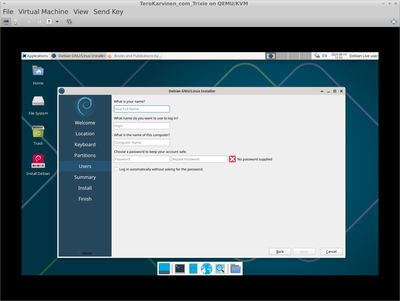
5. Users
Always use good passwords. Never use bad passwords. In my hacking courses, I teach how to break bad passwords and use them for lateral movement, attacking more sensitive parts of the target network. Never practice doing it wrong. You will be even more busy at work.
Users step is weird, as it handles two unrelated things: first user, and the hostname of the whole computer.
The first user will automatically get 'sudo' rights, so he will be able to administer the computer. So this is normally your own user.
- What is your name? "Erkki Esimerkki" - Use your whole real name here. Local characters like ä and ö are allowed here.
- What name do you want to use to log in? "erkki" - lower case, max 8 chars, must start with alphabetic letter a-z, only numbers and letters allowed a-z0-9. The rules for allowed names are not enforced here, but bad names will become annoying later. Often first name for small system, or non-pronouncible combination of first and last name for larger.
- What is the name of this computer? "talvi". A single, lower case word. It could become your computer's public DNS name in some networks, so don't put anything private like your name, your computer model or similar here. Computer hostname is not related to users in any way, so it's funny it's asked in the middle of this screen.
- Choose a password to keep your account safe. Use good passwords only.
- No: Log in automatically without asking for the password. (disabled)
You must use a password that you don't use elsewhere. Min 10 chars. Letters, numbers, special chars. No national chars like ä or ö. Must not be related to any of your passwords. No 13375pe4k (using obvious letter-number replacements only). And I'm so sorry if this is your work password, but don't use anything like "August2025!". I recommend a password manager, like pass or KeePassXC.
Note that using bad passwords in production systems could be criminal negligence. Your client, boss or coworker is not guaranteed to repeat "just put 'loser' as the password, we'll change it later" in court.
6. Summary
If you had forgotten backups on a real computer, you could probably still reboot here and back up your data. After you click "Install", it will start writing over the target drive.
Install (button). If you can't see the Install button, make your VM window bigger or use Alt-I shortcut.
7. Install
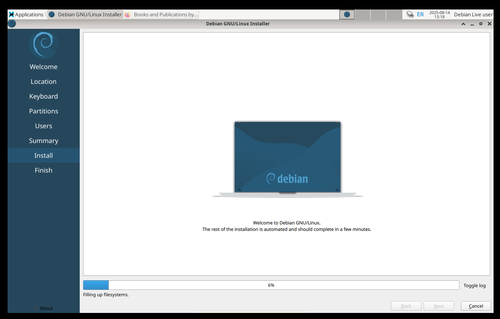
- Installer ran by itself for 5 to 10 minutes without asking questions.
Tip: If your screen locks during installer, credentials are user:live.
8. Finish (reboot)

Finish - All done.
- Yes. Restart now (enabled). Done
You must reboot to start using your new system. You can't permanently save anything on the Live session
On shutdown, a black-blue screen is shown while shutdown proceeds. I pressed ESC to toggle the logs visible.
"Please remove the live medium... press ENTER to continue". Enter.
Tip: With some display adapters and some Linux installers, this prompt is not visible. You can then just blindly press Enter to continue.
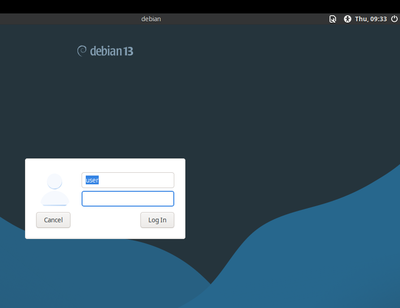
First boot on installed system
- Login screen asks for username and passwords. Use the login name and password you gave. Click log in.
My desktop opens. Login was succesful.
I tested some basic functionality again, similar to my test on the Live session. I searched (Google/DuckDuckGo) "tero karvinen" and clicked a couple of links. These basics worked.
Well done! Linux was installed succesfully.
First steps on new Linux
After succesful installation, I do these initial steps to make the system secure. Snapshots, firewall, upgrade everything.
Having the latest updates and a firewall are required for base level of security. (In addition to always using good passwords) Snapshots allow you to return to previous working state without starting the installation over. Even though doing the install again is pretty easy, too.
Snapshot
Obviously, snapshots are only taken on a virtual machine. In virt-manager,
- View (menu): Snapshots.
- Create new snapshot (blue plus-symbol on bottom left)
Create snapshot (window)
- Name: just-installed
- Finish
View (menu): Console.
Firewall (ufw)
Applications (menu, top left): Terminal Emulator.
Don't type the dollar sign "$" below. It's the prompt, where computer is waiting for your instructions.
Type your own password when asked by sudo. Your password is not echoed, i.e. nothing is shown when you type the letters.
$ sudo apt-get update
$ sudo apt-get -y install ufw
$ sudo ufw enable
Firewall is active and enabled on system startup
Upgrade everything (apt-get)
$ sudo apt-get update
$ sudo apt-get -y install unattended-upgrades
$ sudo apt-get -y dist-upgrade
Do not interrupt the upgrade. For me, the dist-upgrade was less than a minute. It could take a while if your current system is very old, e.g. you installed from an old ISO image.
Everything is upgraded with 'sudo apt-get -y dist-upgrade': all software, operating system, security updates.
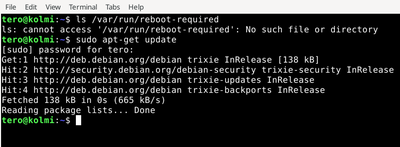
Kernel upgrades require a reboot. I could see the installation mentioned package "linux-image...". This is the only package in Debian repositories whose installation requires a reboot. I ran 'ls /var/run/reboot-required' and could see that a marker file was created to show that I need to reboot. After reboot, the file will be gone and the same command will say "No such file or directory".
Applications (menu): Log Out: Restart.
System will keep itself updated, as we installed "unattended-upgrades" package. We only need to reboot when kernel (linux-image-amd64) is upgraded.
Well done, system is up to date.
I took a snapshot, called "firewall-and-upgraded". I used the same procedure as in the previous snapshot.
Good display resolution
Applications (menu, top left): Settings: Settings Manager
- Display (icon)
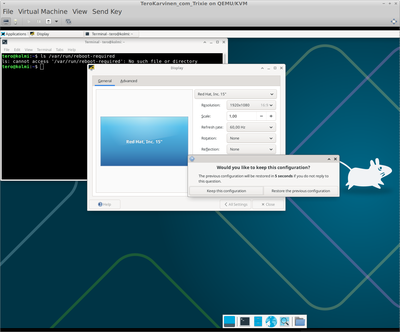
Display (window)
- Resolution: 1920x1080
- Apply
Would you like to keep this configuration?
- Tip: If display is messed up, wait. Do not click anything. Your previous settings are restored in half a minute.
- I clicked "Keep this configuration"
Display resolution was correct, but right side of my desktop was outside visible window.
View (menu): Resize to VM
My full desktop is now shown, with the resolution I chose. You can use the same procedure to set up any desktop resolution you like.
Here, virt-manager is very convenient. Unlike VirtualBox, virt-manager did not need Guest Additions.
Install some basic software
$ sudo apt-get update
$ sudo apt-get -y install bash-completion micro webext-ublock-origin-firefox
You can install a lot more software later. This is what they do
- micro - a text editor. On Applications: Terminal Emulator, you can edit a file with 'micro foo.md'. Common keys work, like ctrl-S save and ctrl-Q quit.
- bash-completion - tab completes. On Applications: Terminal Emulator, start typing a name, then press tab a couple of time: type "ls /et", then press tab.
- webext-ublock-origin-firefox - Ad blocker for Firefox ESR. On Applications: Web Browser, just browse the web and see how most ads have disappeared.
What next?
Learn to use Linux on the command line: Command Line Basics Revisited.
Troubleshooting
No trouble? No shooting. You can skip the rest, enjoy your Linux!
"libvirt.libvirtError: Requested operation is not valid: network 'default' is not active", VM does not start
$ sudo virsh net-start default
And start the virtual machine again.
"The emulator may not have search permissions for the path ...iso" - Step 2 of 5 on "New VM"
In the unlikely case you have set virt-manager to only read specific paths, you should move the iso image to one of the folders you have allowed.
Cursor stuck in virt-manager window - Ctrl-Alt
Press left Ctrl and Alt at the same time to release cursor.
Cursor is usually captured when booting the machine, e.g. in bootloader (Grub).
SeaBIOS... No bootable device
Virtual Machine (menu): Shut Down: Force Off. "Are you sure... ?" Yes.
View (menu): Details
Details (lightbulb tab):
- SATA CDROM 1 (list item on the left)
- Virtual Disk (heading): Source path: ...
- Expand the list of previous options from the small down arrow on the right side of the text field
- Choose your ISO image. Apply.
- (Alternatively, you can choose "Browse" and find your ISO image there)
- Virtual Disk (heading): Source path: ...
- Boot Options (list item on the left)
- Yes: SATA CDROM1 (enable)
- Apply.
View (menu): Console
Virtual Machine (menu): Run
Locked - Debian installer asks for password - user:live
Login for Debian installer is "user", password is "live".
If you leave Debian Live desktop for a while, it gets locked automatically. This also happens when you just leave the installer (Calamares) installing. If you have not rebooted after operating system installation, you're still in the live desktop. So it's not asking for your password, but the live desktop default credentials user:live.
No "Install" button on Debian installer "Summary" step - View: Resize to VM
View (menu): Resize to VM.
It's at the bottom of the window. Probably cut out, because your window is smaller than guest OS screen.
By choosing: View (menu): Resize to VM, the window is resized to guest desktop, bottom of installer window is shown, and the Install button becomes visible.
There are some alternatives that I have used in other environments for the same problem:
- Stretch the VM window bigger. Alt+Right mouse button. Or drag from exact spot on bottom right corner.
- Maximize installer window. Depends on guest screen size and VM windows size if this is enough.
- Press Alt-I, which is likely the shortcut to click "Install" button
My login password does not work - forgot or wrong keymap
Maybe you forgot it. Use a password manager next time, like pass or KeePassXC.
Maybe you typed it with local keymap (Finnish fi) and now it's the United States (us) keymap. Or the other way round. You use the visible user name field to test what your keypresses are producing. Just don't only type the only symbol in your password when others could see it.
Very short summary
What do all these incantations mean? This whole tutorial explains it, start from the start.
Debian.org, Other downloads, Live Xfce: debian-live-13.0.0-amd64-xfce.iso. Directory listing
On host OS
$ sudo apt-get update && sudo apt-get -y install virt-manager
$ sudo virsh net-start default
Virt-manager: New VM: debian-live-13.0.0-amd64-xfce.iso , "Generic Linux 2022 (linux2022)", RAM 4096 MB, CPUs 4, 30 GiB disk.
Bootloader menu: "Try", Live session.
Install Debian. Choose defaults except: Location Europe, Helsinki. Keyboard Finnish, Default. Erase all. Hostname: "dino". Username: your first name lower case. Good, unique password (mandatory). Reboot? Yes.
Applications: Settings: Settings Manager: Display: Resolution: 1920x1080. Virt-manager: View: Resize to VM. On guest OS:
$ sudo apt-get update
$ sudo apt-get -y install ufw unattended-upgrades bash-completion micro webext-ublock-origin-firefox
$ sudo ufw enable
$ sudo apt-get dist-upgrade
Applications: Log Out: Restart